Logo
Schedule a Callback Submit a request Agent Portal Home Troubleshooting Warranty Service General Product Overview Back To Website
Sign in

  1. My Geeni
  2. Smart camera
  3. Troubleshooting

Troubleshooting

Follow New articles New articles and comments

Tutorial and Troublshooting


Common Questions

Camera


Power


Lighting


Appliances


Sensors


General

  • Geeni Camera Cannot connect to Wi-Fi network.
  • How To Set Up a Smart Camera?
  • To Save a Certain Day of Footage From the SD Card
  • Concern/Issue: Not receiving Motion Alerts even though motion detection is set on high
  • Do any third-party camera apps work with Geeni cameras ?
  • Geeni Camera live View & Play back view?
  • General System Requirements
  • How Much Video Can the Camera Record?
  • How to access my Geeni smart camera settings?
  • How to check for serial number and version of Geeni camera?
  • How to Format 64 GB SD Card from exFAT to FAT32 on Win 7?
  • How to format the memory card of Geeni cameras?
  • How to reset the camera or how to do factory reset in Geeni camera setting?
  • How To Set Up a Smart Doorbell? (QR Mode)
  • How To Set Up a Smart Doorbell? (Wi-Fi Mode)
  • I am speaking to the Geeni but I am not able to hear any sound coming back from Camera. Is there any way to fix that?
  • Is Geeni smart camera have any default user name & password?
  • Night Vision (Troubleshooting)
  • Set Up a Smart Camera? (Wi-Fi Mode)
  • The camera appears offline or unreachable, what should I do?
  • There is not an English language city for sunrise or sunset Geeni camera?
  • Video Recording Process (with SD Card)
  • What is motion detection setting of Geeni camera?
  • What is the basic feature setting of Geeni camera?
  • What is the use of Micro SD Card?
  • What’s the Wireless Range for camera?

Troubleshooting

Follow New articles New articles and comments
  • Make sure you entered the correct Wi-Fi password during the Wi-Fi setup. Check whether there are any Internet connection problems. If the Wi-Fi signal is too weak, reset your Wi-Fi router and try again.


    AR-66

  • Before we continue, you need to make sure that nothing is missing from the box. You also need to download the Geeni app and create an account. The general system requirements have to be met before the setup.

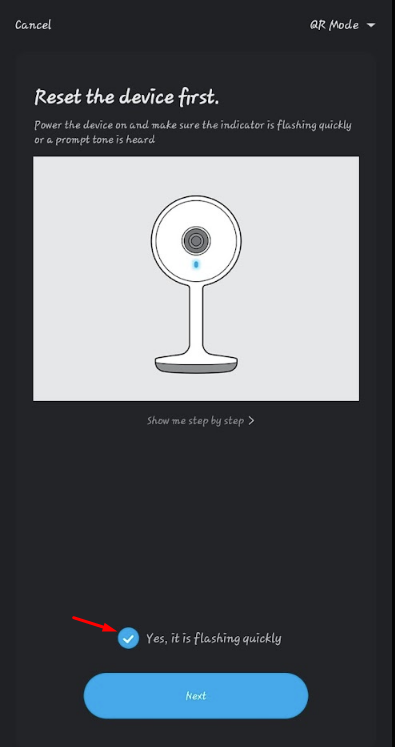
    Depending on the model of the camera you have, your camera can be reset by pressing and holding the reset button or by inserting a pin in a reset hole until you hear a prompt tone from the camera. Once you hear the prompt tone, let go of the reset button or the reset hole.


    Your camera’s indicator light should start blinking after the tone. This blinking light means your camera is in pairing mode.

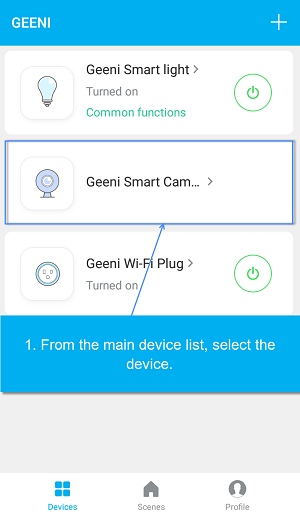
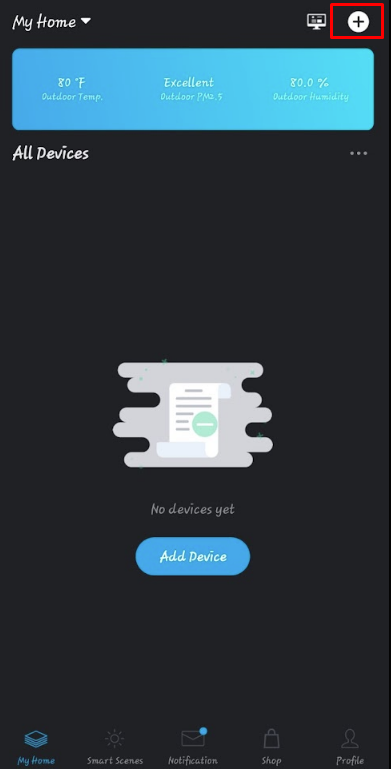
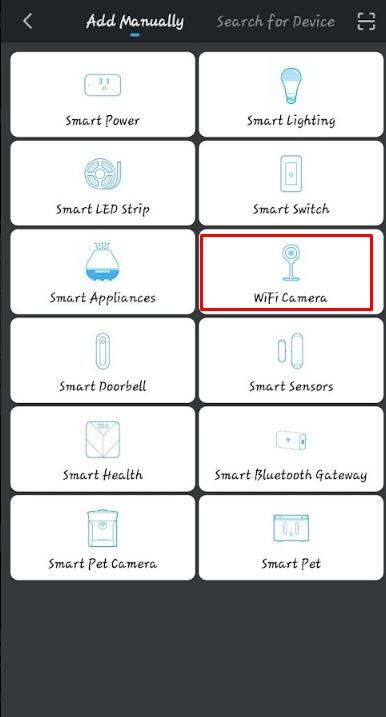
    Launch the Geeni app and on the top right corner of the screen, tap + or Add Device. 

    mceclip0.png

    You will see some tiles on the next page with different device names and select Wi-Fi Camera.

    mceclip3.png

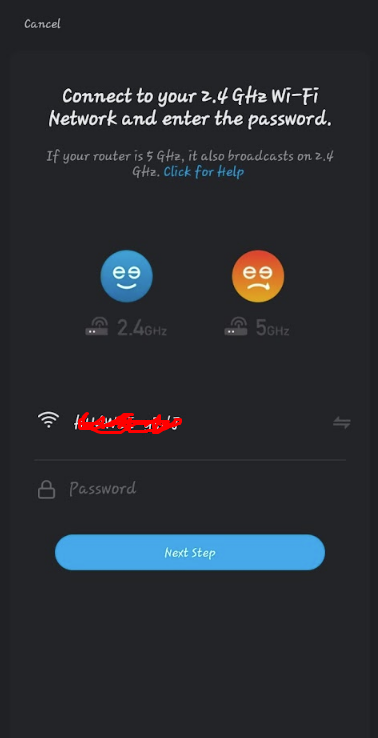
    You will be routed to a page that shows your Wi-Fi name and underneath it, type in your Wi-Fi password, then hit Next Step.

    mceclip4.png

    Confirm "Yes, it is flashing quickly" and tap "Next step"

    mceclip6.png

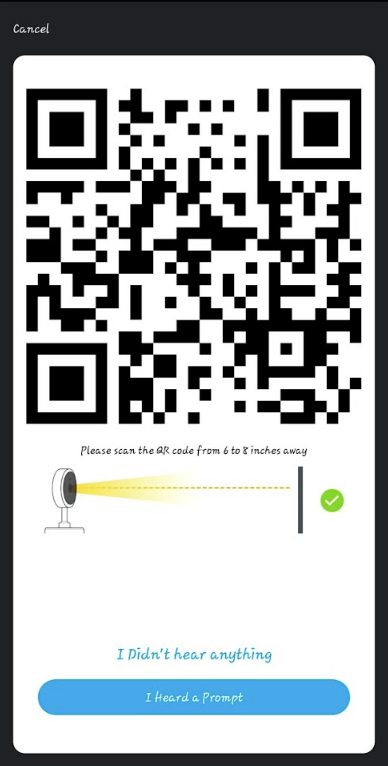
    The QR code will appear on the screen and scan it in front of your camera’s lens. Ensure your phone’s brightness is at max level. You can follow the short video clip for scanning the QR code until another prompt tone is heard. Confirm “I heard a prompt” and hit “Next Step”.

    mceclip7.png

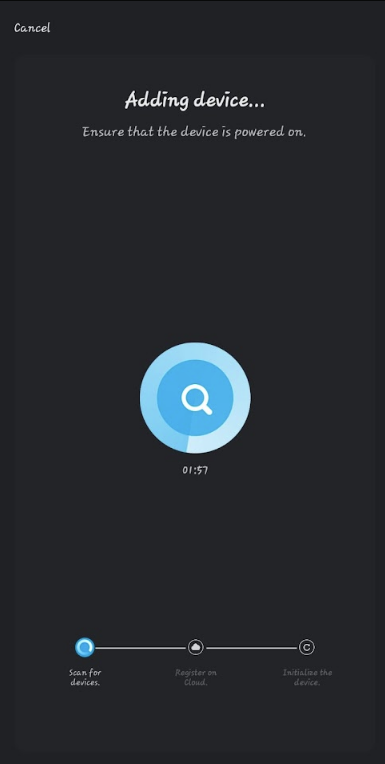
    Wait for the 2 minutes countdown, then tap "Done" once connected.

    mceclip8.png

    You're all set! 

    That Didn't Work? Please try setting up using Easy Mode. 


  • To Save a Certain Day of Footage From the SD Card

    1. Go to your camera on your Geeni app

    2. Tap on Playback (Choose the day to be saved)

    3. Once the desired footage has been determined tap on "Record"

    4. Recordings of the footage are located on the mobile device's default storage.


    AR-145

  • If you are not receiving Motion Alerts even though motion detection is set on high then-

    Possible Causes:

    1. No screenshots saved on the app even though permission is set on the phone.

    2. Permission is not set on the phone.

    3. Defective Camera: Refer to after sales process.

    Probe: Verify where the customer is not getting the alerts (pop up on the phone or no screenshots saved on the App)

    Troubleshooting Steps:

    If on the phone provide permission steps (Same for Android and IOS):

    1. On your device, open the main Settings app.

    2. Tap Apps or Application Manager (depending on your device, this may look different).

    3. Tap on the Geeni App .

    4. Tap permission.

    5.If you want to turn that permission on for a specific app, move the switch to the right until it turns green.


    AR-129

  • No, the Geeni cameras won't work with third party apps. It'll only work with the Geeni App & voice control by Amazon alexa & google Assistant.


    AR-72

  • For live view and play back view of Geeni cameras first open the Geeni app then select Geeni smart Camera from main device list. For playback view you must insert a SD card in Geeni Camera.

    Live view: 

    live.JPG

    Playback view:

    playback.JPG


    AR-62


  • Please be reminded that our smart devices works only with 2.4 GHz. Please check our General System Requirements below: 

    1. Make sure your mobile device is running iOS® 8 or higher or Android™ 5.1× or higher.
    2. Wi-Fi router 802.11 b/g/n
    3. Make sure you’re connecting to a 2.4GHz Wi-Fi network. Geeni Smart Device can’t connect to 5GHz networks.
    4. Wireless router encryption method set to WPA2-PSK, authorization type as AES
    5. Ensure the router has not reached the maximum connected devices limit (usually 24 devices connected)
    6. Ensure the router is not prohibiting devices from connection (such as MAC address filtering)
    7. Know your Wi-Fi network and password. Ensure that the password entered in App is correct when adding new device.

    Once the above requirements have been met, connect your phone to the 2.4 GHz Wi-Fi and proceed to the setup of your device. You can tap our helpful links depending on your device below: 

    Smart Camera Set-Up

    Smart Lighting Set-Up

    Smart Doorbell Set-Up


    AR-122

  • The camera recording depends on the video quality, the camera will use around 1gb of storage per day, so a 32GB card can provide weeks of continuous video. As the card fills up, the oldest footage will automatically be replaced by new video, so you don’t have to ever worry about running out of storage space.


    AR-70

  • To access my Geeni smart camera settings, follow the below instructions: 

    1. From your main device list, click on one of the Camera devices whose settings you want to check.

    1.png

    2. Press the “…” button on the top right for advanced settings.

    2.png


    AR-4

  • To see serial number and version of Geeni camera, follow the below instructions:

    1. Open the Geeni app and from the main devices list select Geeni Camera.

    Step1.png

    2. Click on the device setting "Three dot icons" (…) at top right corner.

    Step2.png

    3. Select for what you want (serial number or version) to see them.

    Step3.png


    AR-6

  • To Format 64 GB SD Card from exFAT to FAT32 on Win 7, follow below instructions:

    1. Plug the 64GB SD card to a card reader and insert into your computer. Be sure that the SD card is detected. Next, install and run AOMEI Partition Assistant.

    2. Right-click the SD card and select “Format Partition”.

    3. In the pop-up window, specify partition label and select FAT32 from the given list. 4. Click “Apply” to execute the pending operations.

    Tips:

    *If the 64GB SD card is a new SD card, you can see an unallocated space there. Right click it and create a FAT32 based partition with “Create Partition”.

    *Above steps apply to format 64 GB SD card to FAT32 in Windows 10 as well.

    *You are able to format SD card from FAT32 to exFAT on the contrary as well.

    Only four steps can you successfully format 64GB SD card to FAT32 under Windows environment. This professional format software is capable of solving Intenso USB write protected issue as well. Obviously, it is a WD quick format tool that used to format WD 1TB hard drive in Windows. The “NTFS to FAT32 Convertor” can assist you change file system without formatting and losing data if you have important files stored on the SD card. You may want to know how to format 128GB SD card to FAT32 as well. Download it to manage your storage devices to a better state.


    AR-103

  • To format the memory card of Geeni cameras, follow the below instructions: 

    1. Select the Camera from main devices list.

    1.png

    2. Select (….) button then Go to settings

    2.png

    3. Now select Format SD card.

    3.jpg

    Once you've formatted the SD card, go back to recording & check alarm If the issue persists.


    AR-5

  • To do factory reset in Geeni camera settings or to reset the camera, hold the reset button for 5 seconds. Once it's reset, camera will provide a voice prompt.


    AR-7

  • Guide to Setting Up Your Geeni Doorbell: QR and Wi-Fi Modes


    Geeni doorbell offer a user-friendly and seamless setup process, allowing you to monitor your space effortlessly. Whether you're connecting through Bluetooth or Wi-Fi mode, this guide will walk you through the steps to ensure a successful and hassle-free setup.


    Note: Users need to Enable Bluetooth and Location. Before diving into the Geeni app, ensure that Bluetooth and Location services are enabled on your smartphone by going directly to you phone main settings and have it set on allowed/ enabled. 


    Note that it is very crucial for the initial setup process.


    Setting Up process using QR Mode:


    1. Reset the Device Make sure the doorbell is ready to be paired. Poke and hold the Reset Button of the doorbell until a beep is heard. 
    2. Indicator Light Status The indicator light will turn solid red, followed by another beep, to blinking red. 
    3. Launch Geeni App and Add Device- Open the Geeni app and tap the plus sign "+" to add a new device. Select "Add Device" to begin the setup. Then click the "Smart Doorbell." 


    4. Confirm Device Power Tap "Next Step" if conditions for the doorbell have been met for Step 1, Step 2, and Step 3.


    5. Confirm Flashing Status When prompted, confirm that the indicator light is" flashing quickly" and tap "Next step" in the app.

    6. Enter Wi-Fi Password Provide your Wi-Fi password under your Wi-Fi name and tap "Next Step" to proceed.

    7. Scan QR Code Hold your smartphone with the displayed QR Code in front of your Geeni Doorbell lens (6-8 inches) until you hear the prompt. Confirm that you heard the prompt and tap "Next Step."

    8. Wait for Connection Wait for the 2-minute countdown, and once completed, tap "Done" to finish the setup.


    If the initial setup fails, you can follow the app's instructions to add your device again using Wifi Mode.

  • Setting Up your Doorbell Through Wi-Fi Mode


    1. Reset the Device - Make sure the doorbell is ready to be paired. Poke and hold the Reset Button of the doorbell until a beep is heard. 


    2. Indicator Light Status - The indicator light will turn solid red, followed by another beep, to blinking red. 


    3. Launch Geeni App and Add Device - Open the Geeni app and tap the plus sign "+" to add a new device. Select "Add Device" to begin the setup. Then click the "Smart Doorbell."   


    4. Confirm Device Power- Tap "Next Step" if conditions for the doorbell have been met for Step 1 and Step 2.


    5. Confirm Flashing Status | Reset the Device Page- On the "Reset the device" page or Step 3, at the top right corner, tap QR Code for Doorbell then switch to Wi-Fi Mode by tapping on it. A window that says "Switched to Wi-Fi Mode" will pop up. Hit "Next".


    6. Enter Wi-Fi Password - Provide your Wi-Fi password under your Wi-Fi name and tap "Next Step" to proceed.


    7. Wait for Connection - Wait for the 2-minute countdown, and once completed, tap "Done" to finish the setup.


    You're all set!


    Should you encounter any issues, refer back to this guide or feel free to reach out to our customer support team. We're here to assist you every step of the way. Enjoy the convenience of secure and accessible home monitoring with Geeni.

     
  • You can fix that through Geeni camera walkie talkie:

    1. Speaker icon allows you to hear what's happening in the room

    2. Click on the microphone button to speak.


    AR-68

  • No, Geeni cameras aren't preset with a username/ password.

    If you have forgotten your username and password then you can factory reset the settings.


    AR-63

  • Advise customer that Night Vision is automatic, but it can be triggered manually

    *Forcing camera to go on night vision*

    1. Cover the entire lens until the night vision indicator lights up. (Solid red light on top of the lens.)

    2. Within 5 to 10 mins it will go back to its normal vision.


    AR-132

  • Setting Up Smart Camera through Wi-Fi Mode


    1. Reset the Device - Make sure the camera is ready to be paired. Press and hold the Reset Button of the camera until a tone is heard. 
    2. Indicator Light Status -The indicator light on the camera will turn solid red, followed by another prompt sound, and then it will start blinking red.

    3. Launch Geeni App and Add Device- Open the Geeni app and tap the plus sign "+" to add a new device. Select "Add Device" to begin the setup. Then click the "WiFi Camera." 
    4. Confirm Device Power - Tap "Next Step" if conditions for the camera have been met for Step 1 and Step 2.
    5. Confirm Flashing Status | Reset the Device - Page On the "Reset the device" page or Step 3, at the top right corner, tap QR Code for Camera then switch to Wi-Fi Mode by tapping on it. A window that says "Switched to Wi-Fi Mode" will pop up. Hit "Next". 

    6. Enter Wi-Fi Password -Provide your Wi-Fi password under your Wi-Fi name and tap "Next Step" to proceed.
    7. Wait for Connection - Wait for the 2-minute countdown, and once completed, tap "Done" to finish the setup. 

    You're all set!

  • Make sure your Wi-Fi router is online and in range. Make sure you have the latest Geeni functionality by clicking “Check for firmware update (for IP IInd Gen Cam)” & "Check for device version (for Geeni wi-fi smart camera)" in your device settings.


    AR-69

  • We're working on software updates, which will resolve this. Once updates are ready, you'll get an in-app notification.


    AR-77

  • The camera recording depends on the video quality, the camera will use around 1gb of storage per day, so a 32GB card can provide weeks of continuous video. As the card fills up, the oldest footage will automatically be replaced by new video, so you don’t have to ever worry about running out of storage space.


    AR-101

  • Motion Detection will detect the motion of the object which is in the front of the camera. When you will turn on Motion Detection, then you’ll receive notifications to your phone whenever the camera senses motion. You can set how sensitive you want it to be.You can also press turn Motion Detection off to make the detection setting off . 


    AR-3

  • The basic feature settings of Geeni camers are listed below: 

    Indicator Light: By default, the camera lights up to show it’s on. Switch “Indicator Light” off to hide the light.

    Flip: If you mount your camera upside down, toggling the “Flip” function will rotate the image so that it’s right side up.

    Time Watermark: Turn the time watermark on to always see a time stamp of when video is taking place.


    AR-64

  • Without a Micro SD card (optional, sold separately), the smart Wi-Fi camera can show live camera video, save screenshots or videos of the camera stream to your phone for later, and record still snapshots of motion alerts when notifications are turned on.

    Installing a Micro SD card will further enable video recording and playback from your phone. When the card is installed, the camera will continuously record and play back video to your phone until the card is full (up to 128GB supported). Video is encrypted and only view-able through the Geeni app on your phone, so do not try removing the Micro SD card to view video.

    Recommended SD Cards:

    Class10 and UHS1 or above such as:

    16G

    • Sandisk Extreme
    • Kingston 16GB SDHC-I SDCAC/16GB


    32G

    •  Sandisk Extreme V30
    •  Sandisk Extreme V30 A1
    •  Sandisk Extreme V30 Pro A1


    64G

    • Sandisk Extreme V30 A1
    • Sandisk Extreme Pro V30 A1


    128G

    • Sandisk Extreme V30 A1
    • Sandisk Extreme Plus V30 A1


    Note: “ No need to reformat the SD Card to FAT32”


    AR-71

  • Wireless Range for camera depends on the range of your home Wi-Fi  router and the conditions of the room. Check with your router specifications for exact range data.


    AR-65

For more information, visit   Mygeeni.com

Copyright 2019 Merkury Innovations.

Schedule a Callback