Logo
Schedule a Callback Submit a request Agent Portal Home Troubleshooting Warranty Service General Product Overview Back To Website
Sign in

  1. My Geeni
  2. Smart light
  3. Smart Light Troubleshooting

Smart Light Troubleshooting

Follow New articles New articles and comments

Tutorial and Troublshooting


Common Questions

Camera


Power


Lighting


Appliances


Sensors


General

  • How to set up Geeni smart light/bulb?
  • How to know the Geeni bulb Mac Address?
  • How to Set Up a Smart Bulb? (Easy Mode)
  • How to set up a smart bulb? (Manual Mode)
  • How to switch On and Off the indicator light for CW007?
  • User manual of Geeni smart light.
  • Geeni bulb cannot connect to Wi-Fi network.
  • What’s the Wireless Range for light bulb?
  • How to set Scene for Geeni light bulb?
  • How to schedule time for Geeni bulb to switch it on/off?
  • How to control Geeni bulb brightness?
  • How to change the color of the Geeni lights?
  • The bulb appears offline or unreachable, what should I do?
  • When I’m not connected to the Wi-Fi, none of my lights are working. Why?
  • How do I access Geeni light bulb from my computer to adjust the color of the Geeni bulb through IP address?
  • Google home can turn light off but not on, only works inherently what should I do?
  • Can I sync my Geeni lights to music?
  • Can I change bulb's color at a specific time?
  • I accidentally deleted the Geeni app. My lights stop working. I reinstalled the app and logged in but now my lights are offline and I can't reconnect. What should I can do?
  • Does Geeni bulb support google home or Alexa only?
  • How to set up Geeni smart bulb if I have already an account on Geeni app?
  • How to set up Geeni bulb on another home or room?
  • Can I use Geeni smart bulb for outdoor? Is there any temperature required?
  • My Geeni bulb is acting like a regular bulb and in the Geeni app it says it is offline. How to reconnect it?
  • How to reset Geeni bulb and what does the blinking light mean?

Smart Light Troubleshooting

Follow New articles New articles and comments
  • For set up the Geeni light bulb first you have to follow the below instructions after that follow the setup process.

    Instructions.

    • Know your Wi-Fi network and password
    • Make sure your mobile device is running iOS® 8 or higher or Android™ 4.1× or higher
    • Make sure you’re connecting to a 2.4GHz Wi-Fi network (Geeni can’t connect to 5GHz networks).

    Set-up process.

    1. Download the Geeni app from App Store or Google Play.

    1.JPG

    2. Register an account on your Geeni app & log in to the App.

    For registration in Geeni App follow the below instructions.

    • After downloading the Geeni app, open it & go to the register option.
    • (For registration you must have a mobile number or any email address active as you'll receive verification code)
    • Enter your mobile number with your country code or your email address & after that enter the verification code.
    • Now you need to create a password & confirm it.

    2.JPG      

    •  Now login to the app.

    3.JPG

    3. Plug In the bulb & reset it.

    4.JPG

    Open the Geeni app & add your device. You can add the devices in Easy mode or in AP mode.

    4.  For Easy mode:

    • Power on the device and confirm that the light is blinking quickly.
    • In the Geeni app, on the top right corner of the Devices screen, click (+) & select "Smart lighting".
    • Make sure the bulb is flashing quickly, indicating it’s ready to connect. If not, turn the bulb off and on 3 times until it is flashing quickly. Press “Yes, it's blinking quickly".

     5.JPG

    • Enter your Wi-Fi network and password.
    • The Geeni app will try to connect your device.

     6.JPG

    5. For back up AP mode:

    • Power on the device and confirm that the light is blinking slowly.
    • In the Geeni app, on the top corner of the Devices screen, click (+) & select "Smart lighting". Choose “AP Mode” in the top corner.
    • Click Next and enter your Wi-Fi details.

     7.JPG

    • Follow the instructions to choose the device from your Wi-Fi list.
    • The device will be then connected.

     8.JPG


  • At this time, the only way to know Mac Address is to install bulb. Once it's installed, you can review your device's info.

    Follow the steps of  "How to see  info of Geeni devices".


    AR-25

  • Once the general system requirements have been met, proceed to the setup of your Geeni smart bulb. Lets try Easy Mode (Fast Blinking)

    Reset the bulb, turn the bulb off and on 3 times (off/on -off/on - off/on) until you reach the fast blinking light. 

    Launch the Geeni app and on the top right corner of the screen, tap + or Add Device. 

    mceclip0.png

    Choose Smart Lighting.

    mceclip1.png

    Type in your Wi-Fi password, then hit Next Step.

    mceclip4.png

    Then this time, choose "Quickly (2x/sec): Easy Mode".

    mceclip0.png

    It will proceed to the 2-minute timer, underneath is a 3-dotted line. Wait for the countdown or look at the progress of the dotted line.

    mceclip7.png

    Tap “Done” once the bulb has been added successfully. You will be routed to the bulb’s dashboard.

    mceclip1.png

    You're all Set! 


  • Before we continue, you need to make sure you have downloaded the Geeni application and created an account. The general system requirements have to be met before the setup and below is the checklist.

    Once the above requirements have been met, proceed to the setup of your Geeni smart bulb. Lets start with the Manual Mode (Slow Blinking)

    Plug in and switch the lamp on to make sure the bulb has power. To reset the bulb, turn the bulb off and on 3 times (off/on -off/on - off/on) until you reach the fast blinking light, then turn the bulb off and on 3 times to reach the slow blinking. 

    Launch the Geeni app and on the top right corner of the screen, tap + or Add Device. 

    mceclip0.png

    You will see some tiles on the next page with different device names and select Smart Lighting.

    mceclip1.png

    You will be routed to a page that shows your Wi-Fi name and underneath it, type in your Wi-Fi password, then hit Next Step.

    mceclip4.png

    A window will pop up, then choose "Slowly (every 2 sec): Manual Mode".

    mceclip3.png

    You will be directed to a page saying “Let's connect to the device's unique hotspot”, then click “Connect now”.

    mceclip4.png

    You will be routed to your phone’s Wi-Fi settings, from there look for a unique hotspot name (ex. Geeni-XXXX, Merkury-XXXX or iHome-XXXX)

    mceclip0.png

    Tap on it to connect. If you see “Unsecured connection” or “Connected without Internet” after connecting to the unique hotspot, ignore it and go back to the Geeni app. 

    mceclip1.png

    The next page you will see is the 2-minute timer, underneath is a 3-dotted line. Wait for the countdown or look at the progress of the dotted line.

    mceclip7.png

    Tap “Done” once the bulb has been added successfully. You will be routed to the bulb’s dashboard.

    mceclip0.png

    You're all set! 

    That Didn't Work? Please try setting up using Easy Mode. 


  • To switch on and off the indicator light for CW007, follow below steps :

    1. Launch Geeni app.

    2. Tap the “Geeni Camera”.

    3. Tap on the (…) button on the top right corner.

    4. Tap the tab that says “Basic Feature Settings”.

    5. At the "Indicator light" tab slide the button to switch it on/off.


    AR-106

  • Click below to download the user manual of Geeni Smart light/bulb.


    AR-97

  • Make sure you entered the correct Wi-Fi password during the Wi-Fi setup. Check whether there are any Internet connection problems. If the Wi-Fi signal is too weak, reset your Wi-Fi router and try again.

  • Wireless Range for light bulb depends on the range of your home Wi-Fi router and the conditions of the room. Check with your router specifications for exact range data.


    AR-61

  • To set scene for Geeni light bulb, follow the below instructions:

    1. Open the Geeni app and from main devices list select Geeni bulb.

    1.png

    2. Click on the ‘scene’ option on the bottom.

    Step2.png

    3. Choose your favorite scene form scene list.

    Step3.png


    AR-26

  • To schedule time for Geeni bulb follow the below instructions:

    1. Open the Geeni app and from main devices list select Geeni bulb.

    1.png

    2. Click on the ‘schedule’ option on the bottom right corner.

    Step2.png

    3. Click on ‘Add timer’.

    3.png

    4. Set your scheduling time & Click on save button in the top right corner.

    4.png

    5. Time will be added.

    5.png


    AR-31

  • There are two methods to control Geeni bulb brightness:

    Method 1st: 

    1. Open the Geeni App & Click on the "Quick Actions" of Geeni Smart Light & Then click on  "Bright" option of Geeni bulb as you can see in the picture.

    1.jpg

    2. Move the white dot left and right to decrease and increase the brightness respectively.

    2.jpg


    Method 2nd: 

    1. Open the Geeni App & Click on the Geeni bulb.

    1.png

    2. Click on the white tab in the bottom.

    Step2.png

    3. Move the white dot left and right to decrease and increase the brightness respectively.

    Step3.png  


    AR-27


  • To change the color of the Geeni lights, follow the below instructions: 

    1. Open the Geeni app & from the main device list select bulb & turn the bulb on.

    1.png

    2. Select ‘color’ tab.

    Step2.png

    3. There will be a color ring with a dot. Move the dot along ring to change color.

    Stem3.png

  • Check the light switch and make sure that it’s switched ON. The light bulb requires an “always-on” power supply to operate properly.

    Make sure your Wi-Fi router is online and in range.

    Make sure you have the latest Geeni functionality by clicking “Check for firmware update” in your device settings.


    AR-57


  • You can't control bulbs when you're not on your wi-fi network. Connect the bulb with wi-fi network & control with Geeni app or voice control through Amazon alexa & Google assistant.


    AR-55

  • No, you can't access Geeni devices through IP address as at this time, we don't provide support for that platform. You'll only be able to control the Geeni devices via Geeni, Google Home, or Alexa.


    AR-19


  • Unlink Geeni app from Google Home and then re-sync both apps.

    Follow the steps of "Sync Google home with Geeni app".


    AR-60

  • No, you can't sync your Geeni smart lights to music as at this time Geeni don't support that function.


    AR-111

  • No, you can't change bulb's color at a specific time. At this time, you can only set a timer to turn bulbs on/off. You won't be able to set intensity.


    AR-58

  • Try setting up bulbs via AP mode. You have to reset twice and select AP mode during the installation process.

    Or follow the steps of "Installation process for Geeni bulb ".


    AR-113

  • Yes, Geeni bulb & other Geeni devices support also google home & Alexa. Open the google assistant app & go to control then you can use these commands listed below: 

    1.**Say "Hey Google", then... **

    *) To turn on/off a light, say "Turn on <light name> ".

    *) To Dim a light, say "Dim the <light name> ".

    *) To Brighten a light, say “Brighten the <light name>".

    *) To Set a light brightness to a certain percentage say "Set <light name> to 50%".

    *) To Dim/Brighten lights by a certain percentage say "Dim/Brighten <light name> by 50%".

    *) To Change the color of a light, say "Turn <light name> green".

    *) To Turn on/off all lights in room say “Turn on/off lights in <room name>".

    *) To Turn on/off all lights say “Turn on/off all of the lights”.

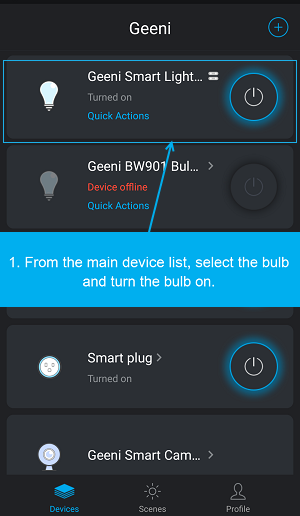
    2. Verify that your Geeni lights are linked to the Google Home app. In the upper right corner of the Home screen, tap devices.

    3. Have you tried renaming lights? that way you can control them individually.

    If Google Home isn't recognizing the turn on command then may be it doesn't know which light to turn on. For example, as opposed to saying "Hey Google, turn on lights," you can now say, "Hey Google, turn on bedroom”.


    AR-115

  • To setup Geeni smart bulb follow the below instructions: 

    1. Download the Geeni app.

    2. Log into the Geeni account you've already created.

    3. Reset bulb twice, it should now be blinking slowly.

    4. Add a new device and select AP mode from the upper right corner.

    Or follow the Steps of "Installation process for Geeni bulb".


    AR-29

  • To setup Geeni bulb on another home or room follow the below instructions: 

    1. Reset the bulb (turn off/on for three times).

    2. Resetting the bulb twice will put it into AP hotspot mode( indicated by slow blinking) , once that's done, you can connect via AP mode in the app.

    Or click here for the "Setup process" of Geeni bulb.


    AR-28

  • Geeni smart bulbs are intended for indoor use only and we don't advise that you use them outdoors. At this time, we don't have a temperature range to offer and encourage you to identify another brand that can be used outdoors.


    AR-59

  • To reconnect the Geeni bulb : Reset the bulb by turning it on/off three times. It should now be blinking slowly, which indicates it's in AP Hotspot mode. You'll then perform an "AP Mode configuration". Or click here for the "Geeni bulb set up process".


    AR-56

  • Reset the bulb by turning it off and on three times. There are two methods of resetting the bulb: 

    1) Reset once (off and on 3 times) to reach Easy Mode, which is the primary way to connect to the app. (In Easy Mode, you’ll see the bulb flashing quickly, 2x per second).

    2) Reset again (off and on 3 times) to reach AP Mode, which is the Backup Mode to help connect. (When in AP Mode, you’ll see the bulb blinking slowly, every 3 seconds).


    AR-30

For more information, visit   Mygeeni.com

Copyright 2019 Merkury Innovations.

Schedule a Callback