Setting Up
-
.To set up your Doorscreen CW013/CW014 via QR code mode, please follow the instructions below:
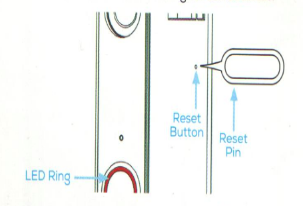
- If Easy mode fails, make sure the red indicator light is blinking. If it's not, reset the smart doorbell by inserting the reset pin into the reset button.
- Hold it in for 10 seconds. On the application click the "+" icon on the upper left corner of the application.
- Then select Smart Doorbell. It will then ask you if the device is on and make sure the indicator light is flashing quickly or a prompt tone is heard. Then click "Advanced".
- on the upper left corner of the Geeni application. Select QR code. It will take you back to the previous screen this time tap on "Next step".
- And then enter the WiFi Password for your 2.4Ghz connection.
- Scan the QR code using your doorbell camera, you should hear a beep then on the app tap on "I heard the Beep".
- It will take you to the progress screen where you can see the status of connection.
-
To set up your Doorscreen CW013/CW014 via EZ mode, please follow the instructions below:
***The smart doorbell requires an existing working, wired doorbell with chime that is connected to a 16V or 24V AC and 10VA minimum transformer.
- Once the doorbell is installed connected to power, the ring around the doorbell button will rapidly flash a red light.
- If the red light does not rapidly flash, reset the device by inserting the reset pin into the reset button and holding for 10 seconds.
On the application: - Once logged in click the "+" icon on the upper left corner of the application.
- Then select Smart Doorbell. It will then ask you if the device is on and make sure the indicator light is flashing quickly or a prompt tone is heard.
- Then click "Advanced" on the upper left corner of the Geeni application. Select Easy mode.
- It will take you back to the previous screen this time tap on "Next step".
- And then enter the WiFi Password for your 2.4Ghz connection.
- It will take you to the progress screen where you can see the status of connection.
- Once successful it will prompt you if the device was successfully connected.
- The app will ask you to either rename the device or maintain the name and select a room for it.
- Then click done.
- It will ask you for your chime settings. Select the chime you have in place then click "Done". And you're all set up.